

Is ML.NET Still Worth Learning?
Is ML.NET still worth learning? An honest look at where it beats an LLM, where it falls short, and a cheat sheet for choosing the right .NET AI tool.
When doing any kind of C# work, whether starting a new, big project, or doing a small console application to play around and put together a proof of concept, you always have to create a project for the simplest of apps. Even if you needed a utility script or tool the same ceremony of creating a project was still needed. However, as of .NET 10, that ceremony is no longer needed. Now we have file-based applications, where we only need cs files for our code to run using dotnet run.
In this post, we will build a file-based application that will be an uptime checker. It will take in a list of URLs and check if they are still up and running. Here’s what the output will look like:
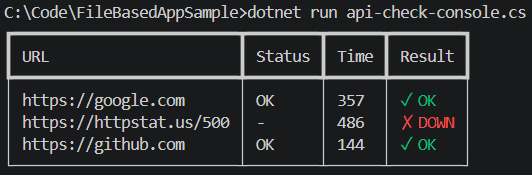
Full code can be found on GitHub.
File-based applications are a single .cs file, but they can be run as a console application or, as we’ll see later in this post, even as a minimal web API. These files can be run without a project or solution file associated with it. What is normally found in the project file, such as package references or file references can be done through the use of directives. Directives are settings for how your file-based app is built. You can think of them as similar settings to what would be in a csproj file. As you can imagine, this can be very versatile in how you can write scripts or tools.
We will use Visual Studio Code and in there will create a single C# file named uptime.cs. That’s all we need to do to get started. It does help having the C# Dev Kit extension installed. File-based apps are a new feature of .NET 10, so you would at least need that SDK installed.
With the file created, we can immediately begin coding. First, we will gather a list of the URLs we want to check. I’m adding three - Google, GitHub, and to test a 500 response, we will use the httpstat.us site.
var urls = new[]
{
    "https://google.com",
    "https://httpstat.us/500",
    "https://github.com"
};
Now, let’s create an HttpClient to make the calls to those sites. We will add a timeout of two seconds, so if there’s no response in that time, it will timeout instead of continuing to wait.
using var client = new HttpClient { Timeout = TimeSpan.FromSeconds(2) };
Along with the status, let’s also return the time it took for the initial call and when we get the response back. To do this we will use the Stopwatch object.
var stopwatch = new Stopwatch();
Don’t forget (or let VS Code do it for you) to add the System.Diagnostics using statement at the top for this.
Now, let’s loop through each of the URLs, perform the call to them, and get the time it takes to return a response. Note that we are using the Restart method on the stopwatch object instead of the Start method. This is because the Start method will continue on the same counter, whereas the Restart method will restart the counter each time.
foreach (var url in urls)
{
    stopwatch.Restart();

    var response = await client.GetAsync(url);

    stopwatch.Stop();
}
This gives us a response but we’re not doing anything with it yet. Let’s get the status and, based on the status, if the response was an HTTP status code of 200 (OK) we can output that it was successful or not. We will first instantiate the variables before the loop.
string status;
bool isOk;
Now, let’s update the loop to use these as well as add a try/catch block for the HTTP call. For the status, we will use the StatusCode property and then we will check that against the HttpStatusCode if it is the code of 200.
foreach (var url in urls)
{
    stopwatch.Restart();

+    try
+    {
        var response = await client.GetAsync(url);
+        status = response.StatusCode.ToString();
+        isOk = response.StatusCode == System.Net.HttpStatusCode.OK;
+    }
+    catch
+    {
+        status = "-";
+        isOk = false;
+    }

    stopwatch.Stop();
}
Now we have our file-based application getting the data that we want. But how do we display it in an attractive way? There’s a package called Spectre that can do a lot of formatting in the console for us. We will use it to create a table for our data. But how do we add a package to the file-based application since there’s no csproj associated with it? For that, we need to use the package directive.
#:package Spectre.Console@0.57.2
The directive will automatically restore any packages. Note that the version number is required for this to work properly.
Now we can add the using statement for Spectre.
using Spectre.Console;
And with that, we can use Spectre within the file-based app. What we will do here is to add a table to capture the URL uptime calls. After the list of URLs we can add the table columns.
var table = new Table();
table.Border(TableBorder.HeavyHead);

table.AddColumn("URL");
table.AddColumn("Status");
table.AddColumn("Time");
table.AddColumn("Result");
And now in our loop we can add a row for each URL in the table.
foreach (var url in urls)
{
    stopwatch.Restart();

    try
    {
        var response = await client.GetAsync(url);
        status = response.StatusCode.ToString();
        isOk = response.StatusCode == System.Net.HttpStatusCode.OK;
    }
    catch
    {
        status = "-";
        isOk = false;
    }

    stopwatch.Stop();

+    table.AddRow(
+    [
+        url,
+        status,
+        stopwatch.ElapsedMilliseconds.ToString(),
+        isOk ? "[green]✓ OK[/]" : "[red]✗ DOWN[/]"
+    ]);
}
All we need to do now is to write the table to the console. Instead of using the usual Console.Write we will use Spectre’s AnsiConsole.
AnsiConsole.Write(table);
To run this, run dotnet run and then reference the cs file.
dotnet run uptime.cs
#:includeWith the above, we had everything all in one file. Often with software, there are ways you can make things more abstract and common where it can be used in many other files. With that, we can refactor out the URL calls into its own method that we can reference inside of our file-based app. We can do that with the include directive.
The include directive is only available in .NET 11 Preview 3 and .NET SDK 10.0.300 and later.
So we can create a new file to hold the function - UrlCheck.cs. In here we have a static class with the CheckAsync method that returns a tuple of three items - the status, the elapsed time in milliseconds, and if the result was an OK HTTP status.
using System.Diagnostics;

public static class UrlCheck
{
    public static async Task<(string Status, long ElapsedMs, bool IsOk)> CheckAsync(
        HttpClient client, string url)
    {
        var stopwatch = Stopwatch.StartNew();
        try
        {
            var response = await client.GetAsync(url);
            stopwatch.Stop();
            return (response.StatusCode.ToString(), stopwatch.ElapsedMilliseconds,
                    response.StatusCode == System.Net.HttpStatusCode.OK);
        }
        catch
        {
            stopwatch.Stop();
            return ("-", stopwatch.ElapsedMilliseconds, false);
        }
    }
}
To use it, in our file-based app file we can include it with the include directive.
+#:include UrlCheck.cs
 #:package Spectre.Console@0.57.2

-using System.Diagnostics;
 using Spectre.Console;

 var urls = new[]
 {
     "https://google.com",
     "https://httpstat.us/500",
     "https://github.com"
 };

 var table = new Table();
 table.Border(TableBorder.HeavyHead);

 table.AddColumn("URL");
 table.AddColumn("Status");
 table.AddColumn("Time");
 table.AddColumn("Result");

 using var client = new HttpClient { Timeout = TimeSpan.FromSeconds(2) };
-var stopwatch = new Stopwatch();
-string status;
-bool isOk;

 foreach (var url in urls)
 {
-    stopwatch.Restart();
-
-    try
-    {
-        var response = await client.GetAsync(url);
-        status = response.StatusCode.ToString();
-        isOk = response.StatusCode == System.Net.HttpStatusCode.OK;
-    }
-    catch
-    {
-        status = "-";
-        isOk = false;
-    }
-
-    stopwatch.Stop();
-
+    var (status, elapsedMs, isOk) = await UrlCheck.CheckAsync(client, url);

     table.AddRow(
     [
         url,
         status,
         elapsedMs.ToString(),
         isOk ? "[green]✓ OK[/]" : "[red]✗ DOWN[/]"
     ]);
 }

 AnsiConsole.Write(table);
Not only can you create a local file-based app, you can also make a simple Web API with it, and with a few changes. The main thing we need here is a new directive - sdk. This can be in a new file alongside the console version - uptime-api.cs.
Unlike with the package directive, the sdk one brings in a whole SDK to use which changes what kind of app it is. So for building a Web API, we can bring in the Microsoft.NET.Sdk.Web.
#:sdk Microsoft.NET.Sdk.Web
Now we can build this out like a minimal Web API. The Spectre code is no longer needed since we’re no longer using a console app. Instead of that we can add the WebApplication.CreateBuilder method.
var app = WebApplication.CreateBuilder(args).Build();
With the app variable, we can create a GET method called health that makes the URL check calls.
app.MapGet("/health", async () =>
{
    var results = await Task.WhenAll(urls.Select(u => UrlCheck.CheckAsync(client, u)));
    return urls.Zip(results, (url, r) => new
    {
        Url = url,
        r.Status,
        r.ElapsedMs,
        r.IsOk
    });
});
The CheckAsync call has been parallelized here with the Task.WhenAll.
And the last thing needed is to call the Run method to run the server.
app.Run();
However, this won’t run as it is right now. When trying to run it will show a lot of compile errors.

To fix that, there’s another directive we can use to help.
property DirectiveThe compilation error is due to using the Web SDK and by default file-based apps do Ahead of Time (AOT) publishing. AOT publishing is an advantage because it allows for native and self-contained publishing for the executables. With AOT on, ASP.NET Core uses the Request Delegate Generator, a source generator that turns each Map handler into compiled code at build time. That’s where these errors come from. To fix that, we need to set this to not use AOT. More info on that can be found on Microsoft’s documentation.
#:property PublishAot=false
With that added, we have our full Web API file-based app:
#:include UrlCheck.cs
#:property PublishAot=false
#:sdk Microsoft.NET.Sdk.Web

var urls = new[]
{
    "https://google.com",
    "https://httpstat.us/500",
    "https://github.com"
};

var client = new HttpClient { Timeout = TimeSpan.FromSeconds(2) };

var app = WebApplication.CreateBuilder(args).Build();

app.MapGet("/health", async () =>
{
    var results = await Task.WhenAll(urls.Select(u => UrlCheck.CheckAsync(client, u)));
    return urls.Zip(results, (url, r) => new
    {
        Url = url,
        r.Status,
        r.ElapsedMs,
        r.IsOk
    });
});

app.Run();
Now when we run this with dotnet run we can see the Web API output.
dotnet run uptime-api.cs
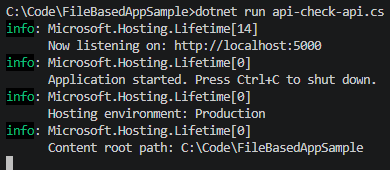
And if we go to the local URL and to the /health endpoint, we can see the JSON response.
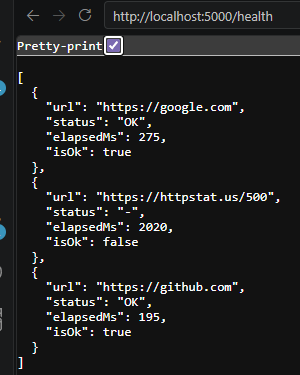
That’s all we need for a simple Web API.
This post showed you how powerful this new file-based feature is from .NET 10. In another post, we will go over how we can do unit tests since there is no csproj as well as deploying where others can use your file-based app.
Is ML.NET still worth learning? An honest look at where it beats an LLM, where it falls short, and a cheat sheet for choosing the right .NET AI tool.
Read and write Parquet files in C# with Parquet.NET, and see why Parquet beats CSV for large datasets. Includes a complete example.

