What's New in the Model Builder Preview
/The ML.NET graphical tool, Model Builder, continues to get better and better for everyone to work with and, most important, for everyone to get into machine learning. Recently, there have been some really good additions to Model Builder that we will go over in this post. We will go through the entire flow for Model Builder and will highlight each of the new items.
If you prefer to see a video of these updates, check the video below.
The team is testing out these new preview items so it currently needs to be opt-in through this Microsoft form in order to participate in it. Once you sign up there you will receive an email with instructions on how to install the preview version.
For even more information about this version of Model Builder and ML.NET version 1.5.5, checkout this Microsoft blog post.
The data for this post will be this NASA Asteroids Classification dataset. We will use this to determine if an asteroid can be potentially hazardous or not. That is, if it would come close to Earth enough to be a threat.
Perhaps the biggest addition to the preview version is the new Model Builder config file. Let's look at this being used in action.
Once you have the preview version installed perform the same steps as usual to bring up Model Builder by right clicking on a project and selecting Add -> Machine Learning. It will now bring up a dialog for your Model Builder project.

Here we can give our Model Builder project a name. We'll name it Asteroids and click to continue. Now the regular Model Builder window shows up, but if you look at the Solution explorer there was a new file added. It was that mbconfig file. We will look at what's in this file later.
We can use Model Builder like usual through the first couple of steps. We'll choose the Classification scenario and will train this locally. Then, we'll add the file and this may take a few seconds since there's a lot of data in here.
Once it's loaded we can specify the label column, which will be the "Hazardous" column at the end.
Let's now explore our updated data options that we get with this preview version. To get there, select the "Advanced data options" link below where you choose where the data is located. This opens a new dialog that shows how we can update the data options. These will be auto-filled based on what Model Builder determines from the data. If you want to override them, these options are available.
Note that there's a small bug in the current version for dark theme of Visual Studio. I have created an issue to let the team know about it. For this section, I'll use the light theme.

The first section, after the column names, is what purpose the column is. Is it a feature or a label? If it's neither we can select to ignore the column.
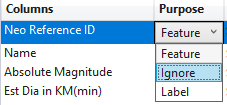
The second section is what data type the column is. You can choose either a string, single (or float), or boolean.

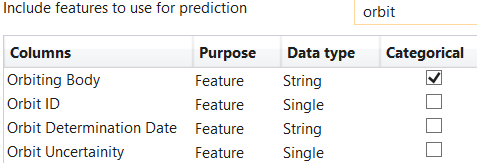
The last section is a checkbox to tell Model Builder if this column is a categorical feature, meaning that there are a distinct number of string entries in there. Model Builder already determined that the "Orbiting body" column is categorical.

Also, notice that we can filter out the columns with the text field on the upper right. So if I wanted to see all the columns with "orbit" in the name I can just type that in and it will filter them out for me. This is definitely helpful for datasets that have a lot of features.
Compare this to what we had in the previous version. These new options give you the same thing, but they are now simpler and show more within the dialog.

The data formatting options haven't changed, though. That's where you can specify if the data has a header row, what the delimiter is, or specify if the decimals in the file use a dot (.) or a comma (,).
Now we can train our model. I'll set the train time to be 20 seconds and fire it off to see how it goes.
Our top five models actually look pretty good. The top trainer has micro and macro accuracies at around 99%!
|                                 Top 5 models explored                                   |
-------------------------------------------------------------------------------------------
|     Trainer                          MicroAccuracy  MacroAccuracy  Duration #Iteration  |
|11   FastForestOva                      0.9980         0.9988       1.0         11       |
|12   FastTreeOva                        0.9960         0.9882       0.9         12       |
|9    FastTreeOva                        0.9960         0.9882       0.8          9       |
|0    FastTreeOva                        0.9960         0.9882       2.0          0       |
|10   LinearSvmOva                       0.9177         0.8709       2.5         10       |
-------------------------------------------------------------------------------------------
Let's now go straight to the consume step. There's a bit more information here than the previous version.

Here they give you the option to add consuming the model as projects within your current solution. Keep a watch on this page, though, as I'm sure more options will be coming. They also give you some sample data in which you can use to help test the consumption of your model.
Now, let's take a moment and look again at our mbconfig file. In fact, you will notice a couple of more files here.

There are now consumption and training files that we can look at. These files are similar to the training and consuming projects that would get added to your solution but you don't have to add them as separate projects if you don't want.
By the way, if for any reason, we need to close the dialog and come back to it at another time to change the data options or increase the time to run we can double click on the mbconfig file to bring it back. This not only brings back the Model Builder dialog, but it also retains the state of it so we don't have to do it all over again.
The reason for that is, if we open the mbconfig file in a JSON editor, it keeps track of everything in this file.
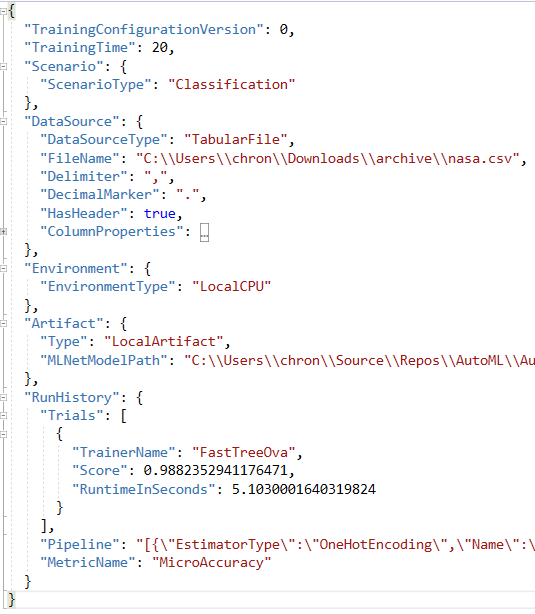
This keeps track of everything, even the history of all of the runs within Model Builder! And, since this is a JSON file, we can keep this in version control so teams can work on this together to get the best model they can.
Hopefully, this showed how much the team has done to help improve Model Builder. Definitely give feedback on their GitHub issues page for any issues or feature requests.