How to Build the ML.NET Repository
/Have you wanted to contribute a bug fix or a new feature to the ML.NET repository? The first step is to pull down the repository from GitHub and get it built successfully so you can start making changes.
The ML.NET repository has great documentation. Part of it is how to build it locally from this doc. In this post, we'll go over the steps to do this so you can do the same and get started making changes to the ML.NET repository.
For a video version of this post, check below.
Fork the Repository
The first thing to do, if you haven't already, is to fork the ML.NET repository.

If you haven't forked the repository yet, you're good to go to the next step. However, for me, since I have already forked the repository a while back, I need to make sure I have the latest.
There are two ways to do sync up my fork with the main repository - running git commands or letting GitHub do it for you.
Syncing the Fork
We can run some git commands to sync up. GitHub has good documentation on how to do this for a more detailed explanation.
The first thing is to is to make sure you have an upstream remote set up to point to the main repository.
To check if you have it you can run the git remote -v command. If there is only an origin remote then you would need to add an upstream remote that points to the original repository.

If you don't have it set, this can be set with the following command.
git remote add upstream git@github.com:dotnet/machinelearning.gitNote that I have SSH set up so I use the SSH clone link. If you don't have this set up you can use the HTTPS link instead.
After setting the upstream remote, we need to get the latest from the
git fetch upstreamOnce the upstream fetched we can merge those changes into our fork. Make sure you’re in the default branch and run this command to merge in the changes.
git merge upstream/mainNow you can start working on the latest code base.
Note here that I attempted to use GitHub to sync my fork. Unfortunately, it seems to not do as good of a job as the git commands.
Install Dependencies
Before we can start to build the code, there is a dependency we need to install. This dependency is included with a git submodule.
If you run the build before this step you will get errors, so it's best to do this before running the build.
To install the submodule dependencies, run the below command.
git submodule update --initWith the submodules installed we can now run the build through the command line.
Build on the Command Line
The build command is made very well in the ML.NET repository so there's very little you have to do to actually run it. We can run this on the command line. The script you run will depend on if you use Windows or Linux/Mac.
For Windows, you would run build.cmd and for Mac/Linux you would run build.sh.
The first time you run it will take a while. It needs to download several assets, such as NuGet packages and models for testing. After you download all of this, though, subsequent builds will go much faster.
Build in Visual Studio
With the main build now complete we can now build within Visual Studio. Although, currently, you may get an error in the Microsoft.ML.Samples.GPU project.

Why do we get this error in Visual Studio and not when we ran the build on the command line? It turns out that Visual Studio was set to have compile errors on warnings. There are a couple of things you can do to fix this.
First, since this is a samples project, the simplest thing is to just comment out the method. Instead of doing that, though, we can update the build properties of the project. We can either set the "treat warnings as errors" to "None".

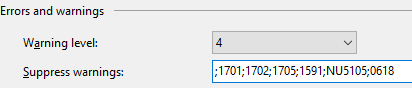
Or, we can update the "Suppress warnings" to specify this specific warning. To get the warning we can go back and highlight the error with our cursor which will bring up a tooltip describing the error. It has a link to the CS0618 warning. We can put in the number in the "suppress warnings" section, 0618, and save the project.
Now we can fully build the solution in Visual Studio. Although, take note about this change when committing any other changes. You can either not include this change or include it and make a comment to discuss with the ML.NET team about it.